
I think all parents will agree…
Developing handwriting skill is one of the fundamental building block for a child’s future success.
Let’s remember how we learned printing.
- As a child, we did not initially understand the concept of language or print. To a young child, letters are just symbols or pictures. ( just like the way we see the cave painting)
- A young child learns new information by using the process of parroting: They copy what the grown-ups say and do, they like the positive feedback when things are repeated correctly, so they retain the information for later use.
Parroting is not always a great method for teaching study skills, such as printing. A child must have a firm and concrete understanding of the concept. I think the best way to teach any new learning concept is the process of repetition and consistency.
Before teaching printing skills…
Here is some helpful information:
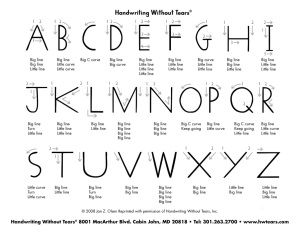
- It is best choice to teach letter writing at random. Did you know letter “A” is one of the difficult letters to write for the first time learners? It does not start at top left corner, lines meet at a point, and it has two diagonal lines at opposite direction. But it’s the first letter of the alphabet.

- Printing is a mechanical skill. It requires fine motor control and hand-eye coordination. It is a safe assumption to think, the best time to teach printing is after child turns 3 years old. Here are some ideas on pre-writing development; such as, writing on vertical surface to promote wrists to naturally bend back into proper form for writing, fine motor skill practice to encourage proper grip development, hand, wrist, and arm strengthening exercises, and hand eye coordination practice.

- The best letter to start is letter “E” it begins at top left corner, lines going across on top, middle and bottom. There are few others in this series… “F”, “H”, and “L”.
- Next group is letters with line beginning in the middle position, such as, “T” and “I”.
- Introduce letters with big curves and little curves. “D”, “B”, and “P”. I would leave out the letter “R” until diagonal lines are introduced.
- Next Group will be curves that begin at middle position, ” C”, “G”, ” Q”, “S”, and “O”.
- Odd letters that doesn’t fit in any group. “J” and “U”.
- Then teach the diagonals. “K”, “M”, “N”, “R”, “V”, “A”, “W” , “X”, “Y”, and “Z”.
- Teach all the capital letters before introducing lower case. Lowercase letters are more difficult for little hands to write.
- Help your child to understand all the pre-writing activities ( fun stuff) was to help them lean the proper way to write (work). When we are doing activities, we can be silly but when it is writing time, it’s time to focus.
- If your child needs help with visual ques, here are some ideas.
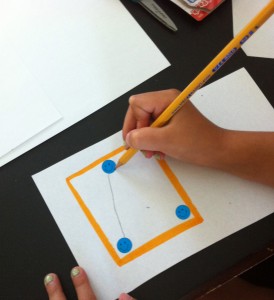
- Use highlighter to draw the box (boundaries), and use stickers to show where to begin or connect lines.

It’s always a good idea to have warm-up practice with your child.

- Teach and show: top, middle, bottom
Model: lines that go up and down, side to side, or diagonal
Introduce and show : big curves, little curves
Teach and model :how to hold pencil correctly
Practice and model: hand strengthening exercises and activities. - Here you can view the You Tube video on Students building a character named, “Mat man” using big curves, little curves, big lines, little lines, and extra additional prompts. It teaches body parts and different functions of each body parts.
These are some additional ideas on helping with handwriting skills.
Handwriting Worksheets and Ideas @ abcjesusloesme.com
Letter School @ Itunes.apple.com
I understand form my own experiences that repetition and consistency are ” easier said than done.” In the end, your efforts will not be wasted. Your child will master a great tool.


Pingback: DIY EASY Fine Motor Games for Toddlers | Simple Planner
Pingback: Writing Practice Sheets for Beginners | Simple Planner